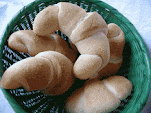
Welcome to October and autumn! This month I'm happy to announce that I am the Kitchen of the Month for the Bread Baking Babes. We are playing with sourdough again, making some yummy rolls that are delicious any time of the year.

Although we’ve made Portuguese Sweet Bread before, I thought we would try our hands at making an offshoot. Portuguese immigrants came to Hawaii in the mid- to late-nineteenth century to work on the livestock ranches and sugarcane plantations. Of course, they brought their love of sweet breads with them, sometimes using pineapple juice and honey when sugar was scarce or too expensive. Hawaiian rolls were created in the 1950s by a baker in Hilo, Hawaii, who found a way to extend the shelf life of the Portuguese bread, which was notorious for spoiling quickly. The Hawaiian bread became so popular that the company eventually expanded and moved from Hawaii to southern California. Several years ago, they expanded again and opened an additional bakery in Georgia.
Because the Babes really enjoy using their sourdough starter, I have chosen two different Hawaiian roll recipes: one uses traditional sourdough starter, the other uses sourdough discard. I made them both in the name of science. Both recipes, plus photos, schedules, and notes, can be found on Amy Bakes Bread. There are other sources as well, such as King Arthur Baking, in case those don’t appeal to you. Just Google, and you will be rewarded!
I look forward to seeing which version you make, how they turn out, and which one you prefer! (And, just in case inquiring minds want to know – I continue to use the yeast water method, tweaking it a bit each time to improve the results. I also make more than I need, which I put in my discard jar in the refrigerator.)
Apologies for the lack of photos. I get so caught up in the making/baking process that I forget to take them. Since we’re all experienced bread bakers, I figure you all can fill in the blanks.
Sweet Sourdough Hawaiian Rolls
Ingredients
Levain (1:1:1 ratio, ready in 3-4 hours at 78-80ºF)
- 55 grams ripe and bubbly sourdough starter about 1/4 cup
- 55 grams all purpose flour about 7 Tablespoons
- 55 grams water about 1/4 cup
Sourdough Sweet Hawaiian Rolls
- 150 grams ripe and bubbly levain (scant 2/3 cup)
- 115 grams canned pineapple juice (about 1/2 cup)
- 60 grams milk (about 1/4 cup)
- 1 large egg (about 50 grams)
- 5 grams vanilla extract (about 1 teaspoon)
- 70 grams brown sugar (about 1/3 cup)
- 20 grams potato flakes (about 3.5 Tablespoons)
- 8 grams salt (about 1 teaspoon)
- 400 grams bread flour 12.5% protein (scant 3 cups)
Instructions
Levain (1:1:1, 3-4 hours until bubbly and active at 78-80ºF)
Mix together 55 grams of ripe and active sourdough starter with 55 grams flour and 55 grams water. Cover and let rise for 3-4 hours until levain has doubled in size, peaked and is airy and filled with bubbles.
Sweet Sourdough Hawaiian Rolls
1. To the bowl of a stand mixer add levain, pineapple juice, milk, egg, vanilla extract, brown sugar, potato flakes, salt and bread flour. Mix until completely combined and the dough feels tacky (not super sticky) and pulls away from the sides of the bowl.
2. Knead together for 8-10 minutes, adding the rest of the flour as needed, until the dough is soft and smooth. The dough should be tacky to the touch, not overly sticky. If it is very sticky, add a little bit more flour, about 20-30 grams at a time.
3. Bulk Fermentation: Put the dough in a container and cover. Set the dough in a warm, 78-80ºF place for 4 hours. Take the temperature of the dough as needed to maintain the dough temperature right around 78-80ºF
4. At the end of about 4 hours, the dough should be puffed up and feel elastic. If it doesn't feel this way, let it bulk ferment for another half hour and check again
5. Overnight Option: At this point, after the bulk fermentation has finished, you can cover the dough and put it in the refrigerator for 24-48 hours. Proceed with the recipe the next day, shaping and proofing the rolls before baking.
6. Shaping: Dump the dough onto a countertop. Cut the dough into 9 equal pieces. Take each piece of dough and pull/pinch up the sides until it forms a ball. Roll the ball on the counter using your hand in a cupping shape (see video here) to seal the balls and create tension for the roll to rise. Place in an 8 by 8 pan, fitting the rolls snuggling next to each other in a 3 by 3 grid.

7. Proofing: Cover the pan with a dish towel and let rise in an 80-85ºF place until puffed up, doubled in size and risen, about 3-4 hours. Do not bake these rolls if they have not risen. Warm the dough up and let them rise longer.

8. Baking: Place a baking stone or baking sheet on the bottom rack of the oven to prevent the bottom of the rolls from burning. Pre-heat the oven to 400ºF. Brush the rolls with heavy cream or egg wash if desired. Bake for about 20-25 minutes until baked all the way through. Top with melted butter if desired and enjoy!


Sourdough Discard Hawaiian Rolls
Ingredients
- 200 grams sourdough discard (heaping 3/4 cup)
- 200 grams canned pineapple juice (about 3/4 cup plus 2 Tablespoons)
- 10 grams instant yeast (about 1 Tablespoon)
- 1 large egg (about 50 grams)
- 30 grams coconut oil, melted (about 2 Tablespoons)
- 5 grams vanilla extract about 1 teaspoon
- 70 grams brown sugar (about 1/3 cup)
- 7 grams salt (about 1 teaspoon)
- 475 grams bread flour 12.5% protein (about 3 1/3 cups)
Topping (Optional)
- egg wash (one egg plus splash of water) optional
- Butter for topping rolls optional
Instructions
1. Knead Dough: To the bowl of a stand mixer add sourdough discard, pineapple juice and instant yeast. Let the instant yeast activate for a minute. You will notice a yeasty smell and the yeast beginning to dissolve. Add the egg, melted coconut oil, vanilla extract, brown sugar and salt. Add 415 grams of bread flour, holding back about 60 grams (scant 1/2 cup). Turn the mixer on and knead the dough together. Mix until completely combined and the dough feels tacky (not super sticky) and pulls away from the sides of the bowl. Add the remaining flour as needed - making sure to not add too much flour to the dough as different brands of flour absorb liquid differently.
Knead together for 8-10 minutes, until the dough is soft and smooth. The dough should be tacky to the touch, not overly sticky. If it is very sticky, add a little bit more flour, about 1 Tablespoon at a time. Remove the dough from the mixer and stick in a medium-sized bowl or container to rise.
2. First Rise: Cover the dough and set in a warm place for about 1 - 1 1/2 hours to rise. The dough should just about double in size during that time. If it hasn't doubled in this amount of time, place it in a warmer spot and give it a little bit more time. Colder dough will take longer to rise.

3. Shaping: Line a 9 by 13 pan with parchment paper. Dump the risen dough onto a countertop. Cut the dough into 12 equal pieces, about 85 grams each. Take each piece of dough and pull/pinch up the sides until it forms a ball. Roll the ball on the counter using your hand in a cupping shape to seal the balls and create tension for the roll to rise. Place in the pan, fitting the rolls snuggling next to each other in a 4 by 3 grid.

4. Proofing: Cover the pan with a plastic wrap or a dish towel and place in a warm spot until the dough has risen, puffed up and just about doubled in size place until puffed up. Do not bake these rolls if they have not risen.
5. Baking: Place a baking stone or baking sheet on the bottom rack of the oven to prevent the bottom of the rolls from burning. Preheat the oven to 400ºF. Whisk together one egg with a splash of water in a small bowl and brush the risen rolls with egg wash. Bake for about 18-20 minutes until baked all the way through. Brush melted butter on top of the warm rolls and enjoy!

Be sure and visit the other Babes to see which version they made and their honest feedback. If you would like to join the fun, bake some Hawaiian rolls and let me know by October 29, sending a link to your post (jahunt22 dot gmail dot com). You too can proudly display a Buddy Badge!
- Blog from OUR Kitchen – Elizabeth
- Karen’s Kitchen Stories – Karen
- A Messy Kitchen – Kelly
- My Diverse Kitchen – Aparna
- Bread Experience - Cathy
- Thyme for Cooking - Katie
- My Kitchen in Half Cups – Tanna