Saturday, February 28, 2009

Daring Bakers: Cake and Ice Cream

And not just any cake, if you please.

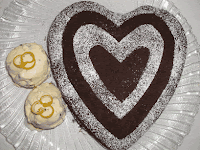
The February 2009 challenge is hosted by Wendy of WMPE's blog and Dharm of Dad ~ Baker & Chef. We have chosen a Chocolate Valentino cake by Chef Wan; a Vanilla Ice Cream recipe from Dharm and a Vanilla Ice Cream recipe from Wendy as the challenge.

February’s challenge is a Flourless Chocolate Cake, Chocolate Valentino, inspired by Malaysia’s “most flamboyant food ambassador”, Chef Wan. Recipe comes from Sweet Treats by Chef Wan.

Wendy and Dharm were the lucky Daring Bakers who selected this month’s two-part challenge: a decadent, fudge-like chocolate cake and a complementary ice cream. They each supplied an ice cream recipe for us, although we could improvise if we wished.

The cake was so simple to make – it only required three ingredients, chocolate, butter, and eggs. It’s really magical how those three things can be transformed into a delicious cake.

Now, to be honest, we weren’t really sure we cared for the cake at first. On the first day, the texture was rather powdery. I wrapped the cake well in plastic wrap and foil and placed it in a storage container. I sort of forgot about it for a few days.

But during those few days, something interesting happened to the cake. The texture began to change and the cake morphed into a kind of fudgy, brownie-like cake. We all felt this was a great improvement, so the cake quickly began to disappear.


I have to say, though, that my favorite part of the challenge was the ice cream. After great thought, I chose my flavor: Turrón Ice Cream from The Perfect Scoop, a take-off on the Spanish sweet treat, turrón.

To prepare, I first made some candied orange peel, using some of my freshly harvested blood oranges.

Next, I made the crème anglaise base, departing from the book’s recipe by whisking together the eggs and sugar, then adding the half & half, honey, and salt. At that point, I put the mixture on the stove top and heated it to about 170°F before combining it with the cream. In place of the orange flower water, I used orange oil. After chilling the mixture overnight, I put it into my ice cream maker and watched as it turned into a creamy frozen delight. Just at the end, I added the toasted almonds, pistachios, and candied orange peel.

What a delicious ice cream! I had to be very strict with myself not to consume the base before freezing it, so I made sure to pack the newly-made ice cream into the freezer as soon as possible.

When paired with the Chocolate Valentino, it was a tasty combination of chocolate and orange, and not too overpowering.

If you have a chance to look at some of the Daring Baker’s blogs, please do. Each one will have a different ice cream or frozen concoction to go along with the cake. Thanks, too, to Dharm and Wendy, our hosts, and to Lis and Ivonne, the DB masterminds.

The recipe for the cake may be found on the hosts’ blogs.


Turrón Ice Cream

(The Perfect Scoop by David Lebovitz)

1 ½ cups (375 ml) half & half

½ cup (100 g) sugar

¼ cup (60 ml) good-flavored honey

pinch of salt

1 orange

1 ½ cups (375 ml) heavy cream

5 large egg yolks

1 teaspoon orange-flower water

2 tablespoons chopped candied orange peel

2/3 cup (75 g) almonds, toasted and coarsely chopped

¼ cup (30 g) shelled unsalted pistachio nuts, coarsely chopped

Warm the half & half, sugar, honey, and salt in a medium saucepan. Zest the orange directly into the mixture. Pour the cream into a large bowl and set a mesh strainer over the top.

In a separate medium bowl, whisk together the egg yolks. Slowly pour the warm half & half mixture into the eggs yolks, whisking constantly, then scrape the warmed egg yolks back into the saucepan.

Stir the mixture constantly over medium heat with a heatproof spatula, scraping the bottom as you stir, until the mixture thickens and coats the spatula.

(Note: I made my ice cream base differently from these instructions. See above.)

Pour the custard through the strainer and stir it into the cream to cool. Add the orange-flower water and stir until cool over an ice bath.

Chill the mixture thoroughly in the refrigerator, then freeze it in your ice cream maker according to the manufacturer’s instructions. As you remove it from the machine, fold in the candied orange peel, almonds, and pistachio nuts.

Makes about 1 quart.

Friday, February 27, 2009

BB: Meringues Chantilly -- Case of the Missing Base

Or, how simultaneously multitasking at 5 things affects your meringues.

I swear I read this recipe over at least a half-dozen times. Did the instruction to pipe a base ever register with the brain? Apparently not.

Then, I went searching for my star tip. I knew exactly where it was, but, again, something wasn’t quite right. I didn’t recall that it was so small. But, I piped merrily away anyway, making my hollow, but tall, towers.

When I put them in the oven, it dawned on me that maybe something was missing. A bottom, perhaps? Let’s check the recipe one more time and see. Why, yes, there is the instruction, clear as day. No excuses, especially since I just had my eyes checked.

And the star tip. When I put away the freshly washed tip, lo and behold, there was the LARGE star tip, sitting neatly as you please in the right spot. I know I would have seen it. Did it become invisible? Burrow into the dish to hide amongst the wine corks and sugar packets?

It’s a plot, I tell you.


Well, I’ve decided to proceed with the recipe anyway and fill the towers with orange-flavored whipped cream and a mixed berry sauce. The kitchen gremlins will not win this time.


Thanks to BMK of Reservations Not Required for choosing Ina’s Meringues Chantilly. If you want to see them made correctly, check out the Barefoot Bloggers blogroll.


I’m still adjusting to a new work schedule, so my apologies for blogging a day late.

Tuesday, February 24, 2009

TWD: Mighty delicious cookies


I figure I made one huge mistake with these cookies this week.

I only made half a batch.


Our task this week for TWD was brought to us by Whitney of
What’s left on the table? Whitney chose Caramel Crunch Bars, and oh my word are they ever delicious!

Using an 8x8" square pan, I pressed in the shortbread base that was flavored with chopped chocolate, cinnamon, and instant coffee or espresso powder. That combination on its own would be fine with me.


After baking, I sprinkled on some more finely chopped chocolate, let it melt before spreading it over the shortbread base, then added some finely chopped toffee*, pressing it into the chocolate layer. After refrigerating it to let the chocolate harden, I removed the giant cookie from the pan, then cut it into small pieces. I didn't have any trouble with the toffee bits falling off, since they were securely glued onto the cookie base with the chocolate.


We instantly loved these cookies, and they just keep improving as they sit (assuming they last that long). I will most certainly make these again and share them with others, only I will make a full batch instead of a half.


I'm wondering how the other TWD bakers liked these cookies, so I'll be sure to check their blogs during the coming week.


*Heath Bits of Brickle Toffee Bits

Tuesday, February 17, 2009

TWD: Devil's Food White Out Cake


For this week’s TWD challenge, we all got to bake the Cover Cake for BFMHTY, otherwise known as Devil’s Food White Out Cake. Stephanie of Confessions of a City Eater was the lucky selector this time.


All went perfectly with this recipe. My layers were thick and had a slight dome, which I forgot to trim off in my haste to frost the cake.


The frosting was easy as well. While the sugar syrup was working to reach 242F, I kept busy in the kitchen, occasionally taking a peek at a show on the Food Network. You just have to have patience with syrup-making. It’s along the same lines as a watched pot. The syrup and the egg whites were ready at the same time, so it all went together very nicely indeed.


I suppose I could have put more frosting between the layers, but I don’t think I ever get that exactly right. I always have plenty to frost the sides and top, so I probably should be more generous with the filling. I guess I’m afraid of running short.


When it came time to decorate with the crumbs, I had to really persuade myself 1) to actually crumble one of the layers, and 2) to actually stick the crumbs on the frosting. I liked the simplicity of the white-frosted cake, and somehow it just seemed wrong to crumble a layer and then stick the crumbs on that nice white cake. But I persevered.


It was difficult to wait to cut a slice, so I think it was in the refrigerator for all of 20 minutes before I gave in. I did send a third of it over to my neighbor so it wouldn’t tempt us to eat it all. She and her son really loved it. We did, too. I think it would be a terrific party cake.


So, thanks to Stephanie for a great choice. I’ll be looking at the other TWD blogs throughout the week to see how everyone did.

Monday, February 16, 2009

BBB Buddy: Five-Grain Bread with Walnuts


The Bread Baking Babes are at it again. Today they announced the latest challenge, Five-Grain Bread with Walnuts, courtesy of Tanna (My Kitchen in Half Cups).


Amazingly, I had every ingredient on hand, much to my surprise. So, today’s baking project was the Five-grain bread. I have to say that the house was filled with a truly delicious aroma while this bread was baking. I waited as long as I could to slice the loaf and slather a piece with butter. It tasted as good as it looked and smelled, and the walnuts were a lovely touch.


If you want to try this bread recipe, too, go to Tanna’s blog. From there you can also see the efforts of all the other Babes.


I’m sure this bread will disappear quickly, so I will most likely be baking another batch very soon.

Sunday, February 15, 2009

BBD17: Bread and Potatoes


Once again it's time for the monthly Bread Baking Day, originated by Zorra of 1x Umrühren bitte. This month our hostess is Lien of Notitie van Lien, who chose a bread and potato combination. There are tons of possibilities with this combination, so I went searching through my cookbooks collection.

In January, I started working at a second job at the local public library, so whenever a cookbook passes through my hands, I take a good look at it to see if I want to check it out. I found my first recipe that way: Potato Chive Bread from America's Best Bread Machine Baking Recipes by Donna Washburn and Heather Butt. Since I have a bread machine, I thought I would study some new recipes. I don't typically bake my bread in the bread machine, however, since I prefer shaping the dough by hand and creating different shapes, but it's sometimes easier to use the machine to
combine the ingredients and have a good first rise without a lot of thought or presence.


I decided to shape this dough into regular rectangular loaves since I thought it would make a tasty sandwich. Well, it would if it lasted that long. It's wonderful toasted and buttered, and goes well with soup and salad.


My second recipe also came from a library book that I discovered one morning, as I was pulling request books from the children's collection, I found myself in the cookbook section, and there was a simple, straight forward book on bread making. There were a few potato bread recipes, so I combined two of them and, once again, used the bread machine to do the early work. This was a potato-rye-molasses-caraway bread. I shaped the dough into boules for the final rise and bake. I like the molasses flavor and the hint of caraway. The potato provides the moistness, and it, too, is good toasted or with soup and salad.


Either of these breads can also be made the old-fashioned way, by hand. It's nice that bread is so versatile.


Potato Chive Bread
(adapted from
America's Best Bread Machine Baking Recipes)

1 1/3 cups liquid (I used the potato water and added milk to make the specified amount)
1 1/4 teaspoons salt
1 tablespoon sugar
1 tablespoon vegetable oil
3 1/2 cups bread flour
1/3 cup plain mashed potato

1/4 cup chopped parsley
1/3 cup chopped chives
2 teaspoons dry active yeast

Measure ingredients into bread machine container, following the manufacturer's instructions. Using a manual setting, process until finished, usually the final rise. Remove from container, shape as desired, let rise and bake at 375 degrees F until the bread reaches an internal temperature of 190 to 200 degrees F, about 45 minutes or so.


Potato Rye Caraway Bread
(adapted from Great Bread! by Bernice Hunt (out of print))

1/2 cup mashed potatoes
1 1/4 cups liquid (water/potato water)
1 tablespoon salt
4 tablespoons molasses
1 tablespoon caraway seeds
1 tablespoon active dry yeast
1 1/2 cups rye flour
2-3 cups bread flour

Place all ingredients into the bread machine container according to the manufacturer's instructions.
Using a manual setting, process until finished, usually the final rise. Remove from container, shape as desired, let rise and bake at 375 degrees F until the bread reaches an internal temperature of 190 to 200 degrees F, about 45 minutes or so.


A Spicy Drink


The first chapter of Cook the Books Club concluded successfully and the next selection was The Language of Baklava by Diana Abu-Jaber. This book is an autobiographical memoir of the author's life, primarily the early years, and describes details of her family in the US and in Jordan. It is peppered throughout with delicious recipes, any one of which would be fun to prepare.

Because of family drama and a few life changes during the months of December and January, I plain ran out of time to finish the book, although I did do a quick skim read through the last half. I was using a library copy, so I had to return it after my renewal limit ran out.


One recipe that really appealed to me was the Shaking Tea Infusion on page 184. I love spicy drinks like chai, and, since the weather has been cold and rainy lately, it sounded like the perfect pick-me-up. I was not disappointed -- it was delicious. I would probably omit the nuts next time, however; they were fine, but didn't really add much to the overall flavor and sank to the bottom of the cup.


It's one way to keep my spice collection fresh, too. I can envision a large spice order in the near future!

On the next cold day, when tea or coffee doesn't sound like the right drink, I would heartily recommend this easily-prepared spicy beverage.


Shaking Tea Infusion

1 cup water
1 small piece of dried ginger (I used a piece of crystallized ginger)
1/4 teaspoon whole cloves
1 cinnamon stick
1 teaspoon anise seeds*
1 teaspoon sugar
pinch of salt
2 teaspoons chopped almonds or pistachios

Combine all the ingredients except the nuts in a small saucepan. Cover and gently simmer for 10 minutes. Strain into a mug or cup and garnish with the nuts. Serve with sugar or honey.

*The anise seeds are optional, but since I love anise flavor I included them.


Thursday, February 12, 2009

BB: Real Spaghetti and Meatballs


The first recipe this month for Barefoot Bloggers is Real Spaghetti and Meatballs, chosen by Rebecca at Ezra Pound Cake. I’ve made meatballs occasionally over the years, so I’m always willing to audition a new recipe.


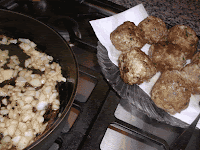
My gosh, these were huge meatballs! I halved the recipe for the two of us and ended up with 8 giant meatballs, enough for a dinner and a lunch. They were delicious, even when reheated.


Meatballs awaiting sauce:


Steaming hot meatballs:


Ready to eat:


Personally, I prefer a thicker sauce, but the flavors for this one were fine. Usually I use a pasta-other-than-spaghetti, although for this event, I used a whole wheat spaghetti. As a child, my mom cooked spaghetti enough times that I grew to dislike it. It was the shape more than anything – it was difficult to eat and always splattered sauce all over my clothes. As an adult, I tend to use shaped pastas for my meals. They are more controllable and less messy. Most of the time.


In celebration of a delicious meal, I opened up a small bottle of red wine that I had. It's a fruity 2004 Pinot Noir from the Santa Maria Valley, Gold Coast Vineyard, and the perfect accompaniment to meatballs and sauce.


I’m betting that the other Barefoot Bloggers will have different variations and outcomes for this dish, so I’d recommend checking them out.


Bake Along #3: Vanilla Malted Cookies


How do you like my Vanilla Malted Cookies? Lovely, creamy color and a strong vanilla flavor.


No?


Perhaps it’s because there was no malt powder to be found, and upon asking, was told it wasn’t made anymore.


Would that be true?


Ok, draw the line in the sand and dare me to find some.


I did.


But it was too late for these cookies.


Researching this question, I found two possible sources: King Arthur Flour at a reasonable price, and the local British import shop for an exorbitant price. Next time I place my KAF order, I will include malted milk powder.


Meanwhile, I substituted chocolate-flavored Ovaltine for the malt powder. In truth, I was lucky that any survived for the photo shoot, since my daughter would grab them off the hot cookie sheet and consume them. They are that good.


I got tired of piping straight lines, so I did a few curvy ones, too. I also dipped the ends of some in melted semisweet chocolate. White chocolate would work, too.


The recipe makes a ton of cookies, so I think they would be great for entertaining a large group of guests, especially when made ahead of time and frozen.


Thanks to Megan and Nic. I’m ready for next month now. . . .

Tuesday, February 10, 2009

TWD: Off to the Islands


This week, Shari of Whisk: a food blog decided to take all the TWD bakers on a journey to the Floating Islands. For some it was a true journey: making crème anglaise, poaching meringues, and burning sugar making caramel. The end result is an elegant, delicious dessert.


Following a tip from Steph, and not wanting to waste milk, I made the meringues first, using the remaining milk in the crème anglaise. Because of the poaching, they can be prepared in advance without any deterioration.


Next came the crème anglaise, which I’ve made many times. Of course, I used my favorite method, beating the egg yolks and sugar together, adding the milk, then cooking until slightly thickened.


I strained the mixture into a small bowl, covered it with plastic wrap, then placed it in a larger bowl filled with ice cubes so it would cool down more quickly and evenly before going in the refrigerator.


Just before serving time, I made the caramel.


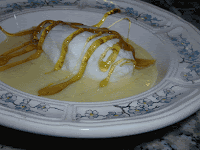
The final dessert was beautiful and tasty.


My only issue was with the caramel. Upon hitting the cold meringue and crème anglaise, it immediately solidified into a lovely but dangerously sharp candy. It was like a war zone in my mouth – the shards of caramel were poking holes in my tongue and the insides of my cheeks! The caramel is a great addition, but next time I’ll either pass on it or make a softer caramel topping.


‘Floating Islands – the dessert’ was a big hit with everyone, and what’s nice is that it can be prepared in advance, so it is suitable for entertaining. Check out the other TWD blogs for all the variations and comment.

Friday, February 6, 2009

YWPWT: Fluffy Bunny Berry Pie


Just in the nick of time, I am presenting my take on a Literary Pie, courtesy of this month's winner, Mary, who proposed a literary theme for You Want Pies With That?.

When my girls were little, one of their favorite authors was (and still is) Rosemary Wells. She has such insight into children's minds and her drawings are wonderful. I've met her several times and she is such a sweet person. Stanley and Rhoda was a favorite.


Our family started using 'catch phrases' from this book in our daily lives. One of the great stories was about Bunny Berries. When Rhoda wanted to avoid things like chores, she resorted to spilling and counting her bunny berries. Over time, when one of the girls procrastinated, she would be accused of "bunny-berrying."
What other choice did I have for this month's theme, I ask you?

The filling for this pie is a blueberry fluff -- so soft, in fact, that fresh blueberries sink immediately.


And, of course, the berries strongly resemble bunny berries.

The end result is a Fluffy Bunny Berry Pie. ( Get it? )


It should be fun to see what other kinds of literary pies will be appearing soon. Thanks to everyone at YWPWT for keeping us challenged.


Blueberry Fluff

1 envelope unflavored gelatin
1 1/4 cups cold water
2 cups fresh blueberries
1/2 cup sugar
1 tablespoon fresh lemon juice (I used fresh lime juice)

1 egg white, unbeaten

Soften gelatin in 1/4 cup cold water and set aside. Place 1 cup of blueberries in a saucepan with 12 cup water. Cover and cook until skins burst, 3 to 5 minutes. Remove from heat and strain; there should be about 3/4 cup. Stir in the softened gelatin, sugar, lemon (or lime) juice, and remaining 1/2 cup water. (I also added some finely grated lime peel.) Chill until the mixture begins to thicken. Add the egg white and beat with a hand mixer until fluffy. Fold in the remaining whole blueberries. Chill. Fill pie or tart shells with fluff, or eat plain in small dishes. Makes 6 large servings.