skip to main |
skip to sidebar
 As we all haven't had enough desserts in the last few weeks, and, as if we haven't thought about eating healthier in 2009, we were given the challenge by co-hosts Nic of Bakeologie and Carrie of Cooking With Carrie to come up with a Resolution Breaker Pie for "You Want Pies With That?" A pie that sounds so scrumptious, that no one can resist it.
Years ago, when I lived in the southwest (New Mexico and Arizona), my family would frequently go out to dinner at Furr's Cafeteria. It met all our needs: the food was plentiful and good; you could eat as much or as little as you wished; everyone could choose their favorite dish; the kids were happy; the adults were happy.
But, like many cafeterias, they did a dastardly deed by putting the desserts at the very beginning of the line!! So many choices! But, I discovered a pie that was to die for. I still don't know what they called it, but I do know that I would have and still will break any resolution to have a piece of that pie. This recipe is the closest I've ever come to duplicating the flavor. And, I'm thinking that the next time I'm back in New Mexico, I'm going to have to return to Furr's and see if my favorite pie is still being served.

Chocolate Cheese Pie
1 9" pie crust, baked
6 ounces semisweet chocolate8 ounces cream cheese, softened3/4 cup light brown sugar
1/8 teaspoon salt
1 teaspoon vanilla
2 eggs, separated
1 cup heavy cream, whipped
Melt chocolate over hot water; cool about 10 minutes.
Blend cream cheese, 1/2 cup sugar, salt, and vanilla. Beat in egg yolks, one at a time. Beat in cooled chocolate and blend well.
Beat egg whites until stiff, but not dry. Gradually beat in the remaining 1/4 cup sugar. Beat until stiff and glossy.
Fold chocolate mixture into the beaten egg whites. Fold in the whipped cream.
Pour into the chilled, baked pie crust, reserving about 1/4 of the mixture for decorating. Chill until filling sets slightly, then decorate with the reserved mixture. Chill overnight.
Ungarnished:

Garnished with some grated white chocolate:

 Even though I firmly believe that 2009 will be a great year, it never hurts to have a little extra help. Each January first, I cook a traditional dish that is supposed to bring good luck throughout the year. Last year it was Curried Black-eyed Pea Soup.
This year it was Curried Black-eyed Pea Soup, made slightly differently and accompanied by braised swiss chard and some really delicious corn muffins containing three kinds of pepper. This was a quadruple-whammy dinner -- the peas represent prosperity and humility, the greens represent money, the ham symbolizes positive, forward motion, and the corn stands for golden money.

I made a few changes in the soup recipe. Instead of bacon, I diced some ham and sauteed it with the onions, celery, and spices. I also used dried peas, giving them a quick soak before the final cooking. They were 98% tender after the quick-soak, so came out perfectly after cooking 20 minutes in the soup. Using dried peas is cost-effective, since I cook only the amount I need, and they are always available in my pantry.
The corn muffins were very good, but I can't talk about them in this post. Come back again on January 13.
This soup is worth making any time of the year, not just for New Year's Day, and it has become a family favorite.
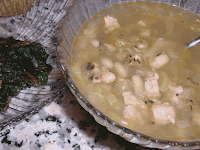
Curried Black-eyed Pea Soup
(2009 changes are in blue)
2-5 bacon slices, diced (depending on personal preference) (1 cup of diced ham)
1 medium onion, finely chopped
2 celery ribs, sliced
1/4 teaspoon cayenne
1/2 teaspoon curry powder
1/2 teaspoon ground cumin
1/4 teaspoon dried hot red pepper flakes
3 15-oz cans black-eyed peas (1 1/4 cups dried peas, quick-soaked and drained)
2 cups chicken broth (6 cups of chicken broth)
3 tablespoons chopped fresh parsley leaves
In a large pot (3- to 5-quart) cook the bacon (ham) over moderate heat, stirring occasionally until golden. Add the onion and celery and cook, stirring occasionally, until the onion is softened. Add the spices during the last minute, and stir to heat them up and bring out the flavors. (If you like it spicier, just increase the amount to taste.) Add the peas and chicken brroth, and simmer, uncovered, for 20 minutes. Season with salt and pepper, if needed.
You can change the texture of the soup by blending all or some of it, depending on your preferences. I usually puree some of the soup using a stick blender to thicken it slightly.
Sprinkle on some chopped parsley before serving. Makes 4-6 servings.
 Today, the first of January, I harvested my first blood orange. I have been waiting Years for this moment!
The tree must have bloomed in 2007, and I never realized it until, about early spring (2008), I noticed some green balls on the far side of the tree. Could it be? Why, yes, it could.
In 2008, the tree was covered in blossoms, so there was no way to miss it. I've tended to this tree even more carefully than usual and watched as the fruit continued to grow. Only in the past few weeks have the balls turned from green to orange.

I'm still not sure precisely when to harvest the oranges. I've kept a close watch on the oldest oranges, checking them periodically, and today, one fell into my hand, so I figured it was close to ripe. I also picked a newer one up off the ground and decided to cut it in half as well to test the color and ripeness. I think it's edible, but certainly would have benefited from a longer stay on the tree.
 These oranges have a sweet-tart flavor with a hint of raspberry and not as acidic as regular oranges. Once I am able to harvest more than one orange, I plan to make Blood Orange Sorbet from David Lebovitz.
I was already looking forward to 2009, but the anticipation of more blood oranges improves the outlook. (I started the New Year listening to The Goon Show and Stan Freberg. How auspicious a beginning is that?!!)
Most of my family has the great fortune to have birthdays either on or near major holidays. Growing up, I just assumed that was normal. Let's see, we have Easter, Fourth of July, Columbus Day, Halloween, Veteran's Day, Thanksgiving, and Christmas. The newest family member was born in late June, so apparently, she didn't read the rule book.
One week ago, on Christmas eve, my daughter, my mother, and I went to celebrate our respective birthdays together at a new (for us) restaurant -- Cafe Firenze -- located in the next town over. Clearly, the menu is Italian, but the special draw of this restaurant, in addition to the good food, is the chef/owner, Fabio Viviani.
Ring a bell?
Fabio is Fabio of Top Chef fame, and while we had no expectations of actually seeing him that night, we weren't disappointed.
I would have liked to have had some photographs from our visit, but the restaurant was rather dark inside. We tried the camera, but even with a flash, it was a no-go. So, you'll just have to accept my descriptions.
We were seated in a booth on one side of the dining room. The large bar was a focal point in the center of the room, with seating around the perimeter. Each booth had small pillows, so that one could adjust the distance from the table and have a comfortable back rest.
After placing our orders, the waiter brought a basket of fresh bread and a bowl of something that looked like salsa, only it was actually bruschetta sauce. Yummy sauce at that. You could eat it straight from the bowl. A plate of lemon and lime slices were also on the table to add to your water glass.
For an appetizer we ordered the beef carpaccio, which was topped with arugula and shaved parmesan. Our three entrees were chicken, spinach, ricotta agnolotti with a tomato sauce, chicken and mushroom risotto, and a beef filet covered with a green peppercorn-mustard sauce and served over garlic spinach and truffled mashed potatoes. All three dishes were very well executed and we ate every last morsel.
I mentioned to the waiter that we were there celebrating our birthdays, and he offered a gratis dessert, a small molten chocolate mousse cake. My mother and daughter ordered the cakes, but I chose a dessert off the menu, a trio of creme brulees. Three small cups of just the right size came on a platter -- vanilla bean, chai, and espresso, all super delicious.
Our experience at Cafe Firenze was definitely positive. Both the food and service were excellent and the prices were in line with comparable restaurants. I'm looking forward to returning, no excuses needed. I would highly recommend a visit if you are ever in the neighborhood.
And, of course, I'll keep rooting for Fabio to win Top Chef!
Happy New Year!
 December was a busy month. Trying to fit in all the baking and cooking events plus regular life events was challenging at best, and I suspect a few things fell by the wayside. One item I couldn't pass up, as usual, was bread, especially a holiday-themed bread.For Christmas breakfast, I made the Yule Wreath from the Bread Baking Babes, with the oversight of my mother and nut-sprinkling help from my daughter. Since I don't know if I can post the same item for two events, I decided to bake one more holiday bread, and send it along to Bread Baking Day #15, hosted this month by Annarasa.I used a basic recipe from Peter Reinhart's Crust & Crumb: All-Purpose Holiday Bread. It's a simple recipe that can be customized depending upon the holiday. I loaded the dough with sliced almonds and finely chopped dark chocolate, and because I don't have a panettone pan, I just made boules, which I brushed with a simple syrup while still warm. It's not a particularly sweet bread, but it is good. There is a slightly brown color from the chocolate. You can add dried fruit instead of chocolate, and try spices like cinnamon, cardamom, or allspice. You can shape it into smaller rolls or make one large loaf. It's that versatile.
So, I hope everyone's new year is a good one and includes lots of fresh bread. Thanks also to Zorra @ 1x umrühren bitte for such a great event.

All-Purpose Holiday Bread
(adapted from Crust & Crumb by Peter Reinhart)
Sponge
3/4 cup (3.5 ounces) unbleached bread flour
2 teaspoons (0.25 ounce) instant yeast
1 cup (8 ounces) buttermilk, at room temperature
 Dough
4 1/3 cups ( 19.5 ounces) unbleached bread flour
1/3 cup (2.25 ounces) sugar
1 teaspoon salt
5 large eggs, cold
1/2 cup (4 ounces) unsalted butter, softened
11.75 ounces sponge (use all from above)
Additional ingredients, such as fruit, nuts, chocolate, spices, vanilla, etc.
1. To make sponge, stir together the flour and yeast in a mixing bowl. Add the buttermilk and mix until smooth. Cover the sponge with plastic wrap and allow it to ferment at room temperature for 1 to 2 hours, until very bubbly.
2. To make dough, combine all the other dough ingredients and the sponge in a mixing bowl.
3. Mix the dough on slow speed for 1 minute, then on medium speed for 5 minutes. Add any additional ingredients and, using the dough hook, mix until the dough is soft and tacky, and the dough registers about 80 degrees F. Add a little water if the dough is too stiff, or a little flour if the dough is too sticky.
4. Mist the dough with cooking spray, cover it with plastic wrap, and let it rise until it increases by 1 1/2, about 60 to 90 minutes, depending on the room temperature.
5. Form the dough into the desired shape. Cover and let rise for 60 to 90 minutes or until nearly double.
6. Bake at 350 degrees F until deep, golden brown, with an internal temperature of 185 degrees F.
7. Cool on rack. Decorate as desired or brush with a simple syrup.

 Even though most of the Tuesdays with Dorie Bakers are posting about cheesecake today, I am writing about butterscotch pudding. I'm not really that perverse (oh, wait, yes I am actually, but that's not the reason). I wrote about my cheesecake last week. To be honest, I wish I still had some because it was an awesome dessert, one of my all-time favorite cheesecakes.
Now, on to the pudding, which I have dedicated to my friend, Megan. This one is for you, Megan!
First, let me say that everyone like the pudding, which I made for Christmas dessert. On the negative side, I thought it was very mild, not heavily butterscotchy, and I have made real butterscotch pudding before, so I have a food-memory for comparison.
Second, call it blasphemy, but I used Irish whiskey, since it was all I had. Even so, I had to beg the 2 tablespoons from my daughter. You see, she turned 21 on the 15th, and her knitting gang (yes, 40 to 50-year-old knitters comprise a gang, especially this particular group) decided to hold a slumber party to celebrate her milestone birthday and welcome back the two 21-year-olds, home on winter break. So, my daughter, because she legally could, stocked up on Guinness, beer, and alcoholic spirits for the party. Not even these hard-core knitters could drink it all, so my liquor supply has now increased in size. But the whiskey is still hers. And she's protective. Hence, the begging for 2 tablespoons.
And, in the end, I could barely taste the whiskey in the pudding. Maybe actual scotch would have been stronger. Maybe I just need to add more.
Back to the pudding. I read that recipe at least a dozen times, and each time I thought, "You've got to be kidding, right?" Pan, food processor, pan, food processor, pan. It's just a pudding for heaven's sake (or similar words to that effect)!
So, with Megan on my mind, and my perversity shining through, I made the pudding my way. Would you be able to tell the difference? Not a chance.
First, I put all the dry ingredients into the saucepan. Then I mixed all the wet ingredients together, except for the vanilla, whiskey, and butter. I combined the drys and wets and cooked the mixture until it thickened. Then I whisked in the small bits of room-temperature butter, and finally, added the flavorings, whisking like a mad woman. (Not really, but it makes a good story.)
While the pudding chilled, and Christmas dinner finished cooking, I toasted some pecans in butter and added a pinch of salt. At serving time, I plopped some freshly whipped cream on top of the puddings and sprinkled on the nuts.

Shall I tell you that we all licked our bowls?
I ended up with only one dirty saucepan and one dirty, large measuring cup. That's it. No frills, no spills, no mess.
My second complaint, though, about the dessert was the toasted pecans. They were really good, but once I ate one, that's all I could taste. The delicate flavor of the pudding was lost. So, for the last remaining pudding, which was all mine, I ate it au naturel and savored the deliciousness of the butterscotch/whiskey flavor.
Next time I make it, and there will be a next time, I will experiment with different spirits and see how they compare.
So, whether it's cheesecake or butterscotch pudding, be sure and browse through TWD for some delicious desserts. For the record, the pudding was chosen by Donna of Spatulas, Corkscrews, & Suitcases.
**Just as an added note, butterscotch (the original stuff) has nothing to do with scotch. It's a mixture of butter and brown sugar, used to make candy, sauces, and puddings. The 'scotch' part comes from the process of cooking (scorch) or from cutting the hard candies (scoring). Feel free to indulge.
 I seem to be having a last-minute end-of-the-year baking/posting frenzy trying to squeeze everything in. I really enjoy participating in the Weekend Cookbook Challenge and it was so easy this month that I saved it for the last possible moment.
Right.
In fact, the recipe is really quick and easy and downright tasty to boot. I really shouldn't have waited until the last minute because now I have a bunch of delicious cheese balls that I will be forced to eat. They go with champagne and New Year's Eve, right? Sara, of i like to cook, came up with the appetizer theme for the last WCC of 2008. I haven't made these in so long, and truly, I don't recall where the recipe originally came from, but I do know it's a good one.
And, all you bakers with extra Rice Krispies floating around from a recent challenge, this is the recipe for you!
Have a happy New Year everyone. Oh, and have a cheese ball, too.

Cheese Rice Krispy Delights
1 stick of butter, softened
1 cup of grated cheese
1 cup plus 2 tablespoons flour
1 cup of Rice Krispies
(If needed, a few drops of water)
Mix. Form into balls. Place on a greased cookie sheet. Bake at 350 degrees F for 20 minutes.
I guess that's what instructions were like way back when. Here's what I actually did:
Cream butter with a mixer. Add grated cheese and mix thoroughly. Add flour and mix thoroughly. Add the rice krispies and mix until incorporated, using a spatula to blend in any remaining dry bits. I didn't need to add any extra water.
Form into bite-sized balls and place on cookie sheet. Bake. Remove to rack to cool. Try not to devour all at once.
Check out the WCC round-up later this week for some great appetizer ideas.