Tuesday, May 12, 2009

TWD: Time to Pucker Up


After a long day’s work at the library, I think I’m a little on the brain-dead side, so this post is going to be short and sweet. Maybe a bit lemony and sweet and sour. Thanks to Babette of Babette Feasts, the Tuesdays with Dorie group made some truly tart lemon tarts. We used the entire lemon – peel, pith, and juice!

Contrary to popular opinion, I, in that perverse way of mine, decided to follow the recipe precisely, and that’s just what I did.

Sure, the filling was tart with bitter notes, but when paired with a dollop of sour cream (or crème fraiche), it was lovely. I did manage to torch one of the tarts, brulee-style, until the butane ran out.


My only complaint would be the amount of filling in the baked tart. I filled them to the brim, watched the filling rise up and then collapse again, leaving a burnt sugar edge around the perimeter, but when I finally cut into the tart, there was just a thin layer of filling over the crust. Much of it had ended up as the burnt edge, so I was a bit disappointed about that.


While this particular recipe was easy to make and tasty, I don’t believe it will replace the Most Extraordinary French Lemon Cream Tart.


Drop by the other TWD bakers to see their tart tarts, and if you’re brave enough, you’ll find the recipe on Babette's blog.

Saturday, May 9, 2009

My Kitchen, My World: Mexico

Ever since I started my second job, it's been hit or miss whether I can participate in all the cooking and baking events I enjoy. Mostly, it's a miss from running out of time. My heart is still in it but sometimes the deadlines catch me unawares.

When I saw the chosen countries for this month's My Kitchen, My World, I instantly knew what I wanted to prepare for Mexico. I've been 'auditioning' one of the newer cookbooks by Rick Bayless, Mexican Everyday, and since nearly every recipe in that book sounds really delicious, I decided to choose one for this event.


Years ago, we would take family trips down into Mexico, so I have fond memories of the people, the food, and the sights. In Mexico City, the food was very sophisticated and continental. I ate my first ever cannelloni in a restaurant/hacienda just outside the city. I've never since had a cannelloni dish as good as that one, although it is one of my favorites.

Because I'm a native New Mexican, Mexican-style food is always near the top of my favorites list. I love preparing the rustic, country-style foods, and comparing the flavors and ingredients between the two cultures (New Mexican and Mexican). When I saw this particular recipe in Bayless' book, I knew I had to make it. I was not disappointed by the results, so Mexican Everyday will definitely go on my 'to buy' list. If you try it, I hope you enjoy it as much as I did. Check out the MKMW blog for other tasty Mexican dishes.


Red Chile Chicken and Rice with Black Beans (Arroz Rojo con Pollo y Frijoles Negros)
(Mexican Everyday by Rick Bayless)

2 tablespoons vegetable or olive oil
4 boneless, skinless chicken breast halves
salt
2 1/2 tablespoons ground ancho chile powder, divided
1 medium onion, diced
1 cup rice
4 garlic cloves, peeled and finely chopped
1 1/2 cups chicken broth
1 15-ounce can black beans, drained and rinsed
1/4 cup chopped green onions (or 1/3 cup chopped cilantro or 2-3 tablespoons chopped fresh epazote)
1/2 to 1 cup salsa for serving

Heat the oil in a medium saute pan. Sprinkle both sides of the chicken breasts with salt and 1 tablespoon of the ancho chile powder. Lay them in the hot oil in a single layer, browning on each side. Remove to a plate to cool.

Add the onion and rice to the pan. Stir for several minutes, until the rice turns opaque. Add the garlic and the remaining ancho chile powder and cook 1 minute. Add the chicken broth and 1 teaspoon salt. Stir well. Bring the mixture to a boil, then reduce heat and cover the pan. Simmer for 10 minutes.

Meanwhile, cut the chicken breasts into 1-inch cubes. After the 10 minutes are up, add the chicken and the black beans to the rice mixture. Re-cover and cook 12 minutes longer.

After 12 minutes, uncover and sprinkle on the chopped green onions and test rice for doneness. If the rice is nearly cooked, re-cover the pan and let it stand, off the heat, for another 5 to 10 minutes to finish cooking the rice.

Fluff the mixture and serve with salsa on the side.

Serves 4

In the cookbook, the author gives some alternatives for playing around.

Tuesday, May 5, 2009

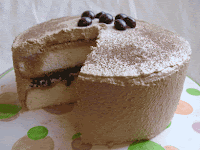
TWD: Tiramisu Cake


This week, the Tuesdays with Dorie challenge is brought to us by my friend, Megan. I'd been wondering when her turn would be, and just like that, there was her choice: a delicious Tiramisu Cake.


I had to plan this one carefully, since this past weekend was my 3-days-in-a-row work weekend. Not my favorite. So, I made the cake on Friday and finished it Sunday evening so it would have time to cure for Monday night's photo shoot and tasting.


Even though I have a bottle of Kahlua in the cupboard, it is unopened, so I chose to use my coffee-flavored tequila, which is opened. I picked it up in Mexico several years ago while on a cruise along the western coast. My daughter and I did a Tequila Tour at one of the ports, and I came back with a variety of flavored tequilas, which are useful for cooking as well as sipping.


The cake assembled nicely, although I could have been more liberal with the syrup on the first layer.


The frosting wasn't as smooth as I would have liked, either, but Sunday was a warm day, so the mascarpone was very soft and I accidentally poured in twice the amount of alcoholic beverage. You'd never know by tasting, though, but I suspect that's why I had lumpy icing.


So, thanks, Megan. Great choice! Be sure and look at all the clever TWD bakers' blogs for their take on Tiramisu Cake.

Friday, May 1, 2009

BBB: Injera


Once again, the Bread Baking Babes have offered an interesting bread baking challenge for their buddies. This time it is Injera bread, an Ethiopian staple, chosen by the hostess-du-mois, Mary.

It so happens that I love injera bread, having tasted it at a variety of Ethiopian restaurants. Actually, I really like Ethiopian cuisine. In Los Angeles, there are several establishments on Fairfax Avenue. I've been to two of those, plus another in New York City. I love the use of spices in both the meat and vegetable dishes.


My first task for this challenge was to locate teff flour, the
prime ingredient for injera. I sent my daughter out to the local health food store, and she returned with Teff Grain. Close, but no cigar. I called around, discovering that the nearest Whole Foods, 40 minutes away, had some in stock. It turned out that my dear neighbor was heading to the Valley the next day (that's the San Fernando Valley), which meant she would be passing right by Whole Foods. She kindly agreed to stop in and get the teff flour for me. (She's great!)


The next step was to plan the fermenting schedule, since I had to work over the weekend. I planned to have the mixture ready for Thursday. Note that I planned well for the injera, but not the accompanying meal. Because I had some berbere seasoning remaining from a previous cooking event, I did make Doro Wat, but as for side dishes, well . . . . next time.


Mary's instructions were right on the mark.
The fermenting mixture gives off an interesting odor, strong enough that the dog kept searching for the source. It was funny to see her wandering through the house, nose in the air, sniffing for this interesting smell. Trying to describe it, I would liken it to a cross between olives and Tacoma, Washington. No offense to Tacoma, but the wood processing industry does have a unique scent. As a child, I would always plug my nose when we drove through town.

Cooking is easy, since it's just like making pancakes. Luckily, the cooked injera tastes way better than it smells!


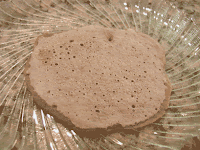
First one out of the pan:


Somewhere in the middle:


Bite-sized piece of injera and spicy chicken:


I'm thrilled to have a new bread in my repertoire, even if it does require a bit of planning ahead of time. Having an authentic Ethiopian meal at home seems like a great idea for an enjoyable social evening.

Thursday, April 30, 2009

Springtime or Anytime Bread

Bread Baking Day #19 is being hosted by Cindy of Cindystar, and her choice this month is Spring Country Bread. With the advent of warmer weather, it's time to think about eating al fresco once again, although here in southern California, outdoor dining takes place nearly all year long.

One of our favorite foods is hamburgers, grilled to perfection and served on homemade buns.


Ready to rise:


Ready to bake:


Fresh from the oven:


I've been using a specific recipe for many years, shaping the dough into a variety of rolls and loaves, but it's original form was supposed to be hamburger buns. I've always liked its adaptability, and it doesn't hurt that it is easy and tastes great!


So, just in the nick of time, I'm sharing the bun recipe with all the BBD folks.


Thanks to Cindy and Zorra!


Moomie’s Buns


1 c water


2 tbsp butter


1 egg


3 1/4 c. flour


1/4 c. sugar


1 tsp salt


3 tsp instant yeast


Place all ingredients in your bread machine. Select manual dough cycle. Allow to run cycle.


Dump out onto lightly floured surface. Divide into 8 pieces. With each piece, slap into a bun shape. Usually 4 or 5 slaps will do it. Place on greased cookie sheets or your bun pans, cover; rise about 30 to 40 minutes.


Bake in preheated 375 degree oven for 12 to 15 minutes til golden. Cool on wire racks.

Tuesday, April 28, 2009

TWD: Creamy Chocolate Tart


Because my second job has me working on weekends, my baking time has been severely impacted. I should have had this tart completely finished yesterday, but, alas, I ran out of time.

The crust was baked and ready.


The filling was prepared and cooling. At 9:30 pm.


I finally gave in, realizing the whole dessert wouldn't be ready until this morning, posting day.


This was an easy dessert to prepare. I used the food processor for the crust as instructed, and my patience was rewarded with a nice, dark chocolate dough. I used my Fair Trade Cocoa, which has a lovely flavor.


As usual, I prepared the creamy filling in my standard way, blending the sugar, salt, cornstarch, and eggs together, then whisking in the milk and cooking until thick.
Rather than melt the chocolate, I finely chopped it and stirred it in along with the butter bits. This morning, after whipping the cream topping, I used the beaters to whip up the filling, saving some dish-washing time.


Looks like we'll be having dessert for lunch today.


I guess we'll manage.


Thanks to Kim of
Scrumptious Photography for choosing Dorie's Chocolate Cream Tart. I will definitely make it again because it is truly a showpiece!


Check out the other TWD bloggers and see their chocolate pies.


Monday, April 27, 2009

Daring Bakers: Cheesecake of a Different Color


The April 2009 challenge is hosted by Jenny from Jenny Bakes. She has chosen Abbey's Infamous Cheesecake as the challenge.

At first glance, the April Daring Baker challenge appeared deceptively simple – just bake a cheesecake.


Ah, but this is the Daring Bakers, where there is always a twist.


The fine print stated that our challenge was to create a cheesecake with a personal spin, using the basic recipe as our foundation. If you happen to check out the cheesecake for the other Daring Bakers, you will find an infinite number of variations, both in size and flavors.


For my cheesecake, I chose to use the natural bounty of my backyard, which at this time of year is primarily citrus.


I created a Neapolitan Citrus Cheesecake with one layer each of blood orange, lime, and lemon. Instead of the usual graham cracker crust, I prepared one consisting of ground almonds. The topping was simply a glaze of Blood Orange Marmalade.


My goal was to make a light, fresh cheesecake instead of one heavy with darker ingredients, and I was pleased with the final result.


For the recipe, take a look at Jenny's blog.